Month: June 2013

Expanding System Drive of a running W2K3 VM using EXTPART

At some point in time a VM will run low on disk space and you’ll need to add more space to it. For VMs running Windows server 2008 this isn’t an issue but anything older, well , you had to use tools such as DiskPart to get the job done. Let’s say the system drive was running low, for W2K3 servers, this was a little bit harder to expand because you needed to shutdown the VM. Depending on what you were running on that VM getting that shutdown approval could take an act of congress to pass. Expanding the system drive on a running W2K3 VM is not impossible though, for I have the solution that could solve those woes.

A few years ago when my company was just getting started on our virtualization infrastructure (VMware of course) I became familiar with a nice little tool that would expand drives on the fly for VM’s running W2K3 or older. This was pretty important considering over 80% of our servers at the time were still on W2K3. What’s this magical tool that can save us admins from having to shutdown a VM because the users hoarded all the space?

Dell’s EXTPART. I will tell you that there is no guarantees with this and use at your risk. Since I’m a daring person , well honestly, just don’t want to go asking to shutdown the server, I’ve used this tool. I have used it quite often too. I’m still alive, the servers survived, and half the time they didn’t even know they were low on space because I proactively fixed the problem.

Now, this isn’t the magical tool that fixes everything because it does have some caveats. For instance, you can only expand system drives on while running if the VM was not P2V’d. If the VM’s were built from scratch or from a template this tool works great but if your VM was P2V’d you need to reboot into safe mode to expand the system drive. Expanding non system drives while running is perfectly fine on P2V’d VMs using EXTPART.

To use this EXTPART do the following:

  1. To use EXTPART to expand a drive you will first need to download the tool and save it to a location on the VM. The tool can be found here
  2. In vSphere, go to the settings of your VM and increase the Hard disk that you want to expand. If it’s the system drive then most likely you will want Hard disk1.
  3. EXTPART_1

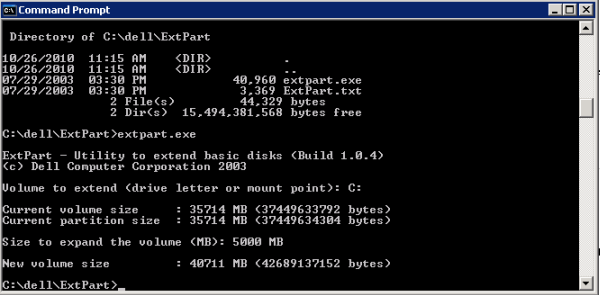
  4. Now go to your VM, open a Command Prompt and navigate to the directory where you saved the download.
  5. Once you are in the file directory of EXTPART, run the extpart.exe file
  6. You will be prompted to type in the Volume or Drive that you want to expand, type in C:
  7. After putting the volume it will display the details of the drive, such as volume and partition size, and ask how much you want to expand the drive. At this point enter in the size (MB) that you want to expand the drive by. This is the amt you are increasing the drive with not the total size of the drive.
  8. EXTPART_2

  9. Once complete press enter and the size of the increased volume will be displayed.
  10. If this fails with an error that “the disk is not accessible” then most likely the VM was P2V’d and you will need to reboot the VM into safe mode. Once booted into safe mode start at step 3 again.

So there you have it, an expanded drive on a running W2K3 VM. No time downtime and you look like a hero for expanding the drive. #WINWIN

Advertisement

My Thoughts on TechEd 2013

I was recently just asked what my thoughts were on TechEd 2013 after just returning from the conference in New Orleans. My first instinct was to say “It was great, had a fabulous time!” but I figured I should sit on the question a little bit and really think about how I really felt. I would not have been lying if I simply just said I had great time because I did. New Orleans is an exciting city with so much activity how can one not have a good time down there? So…what are my thoughts on TechEd 2013?

I thought it was a good conference overall but felt content was a little weak in some areas. The Azure sessions were good though, especially for someone just getting into it. You can definitely tell the push was Azure and the all things cloud. If you didn’t get that hint I have no idea which conference you were attending. There good buzz around SCCM 2012 R2, Visual Studio and of course Windows 8.1 and Windows Server 2012 R2. Now content related to Exchange was weak & lacking any real excitement which was expected because MEC is just around the corner. For those that don’t know what MEC is, it’s the Microsoft Exchange Conference where all the IT Professionals of the Exchange world gather to discuss and learn all things Exchange.

As an Exchange admin I am excited for MEC but think it hurts TechEd content because it seems as if Microsoft holds back on big announcements at TechEd. In my opinion they should stick with TechEd and stop the focused conferences. Don’t get me wrong, I think it’s great that the Exchange community can get together and bring out our Exchange geekness together. It’s just sometimes too much to try to attend all these conferences, most businesses can’t afford to send people to both TechEd and a specialty conference. It’s not only the cost of conference but the time away from the office that businesses need to take into account, with IT shops running thin; sending people away can be a real issue.

If Microsoft were to combine the conferences again it can make TechEd even easier to attend for someone that is struggling to choose between which conferences to go to. TechEd is great a conference because you can connect with all sorts of IT professionals not just your specialty and you have the option to take sessions that is outside of what you typical attend at MEC or any other specialty conference. One of the big values of attending one of these tech conferences is the networking, making the contacts that you normally wouldn’t be able to do elsewhere. If being able to do it at one place that’s even better for someone that can’t get away from the office all the time.

So that’s how I really feel, it’s not right or wrong, just an opinion.

Unable to resize a Netapp volume?

There maybe times that you will need or want to re-size a Netapp volume and normally this is process is very easy to do. You can re-size a Netapp volume using  the ONcommand tool, Filerview, or even SSH into the filer directly. Either of these ways is perfectly fine, no wrong way to do it except for when it fails.

A common error I have seen for failed volume re-sizing is due to the “fs_size_fixed”  error.

vol3

The “fs_size_fixed” is a parameter that has been enabled on the volume either during setup or during a snapmirror relationship break. The parameter is there to prevent any type of accidental re-sizing on the volume.  The only way to re-size the volume is to remove the “fs_size_fixed” parameter by connecting directly to filer through an SSH tool and running the following commands. Once the parameter is removed you will be able to re-size the volume.

1. Connect to the filer ( you can use Putty if you have it)
2. First verify that “fs_size_fixed” is enabled on the vol, type : vol status [name of vol]

you will see in the status that “fs_size_fixed” is set to ON

vol1

3.  At the prompt type  : vol options [name of vol] fs_size_fixed off

4. You can confirm that the parameter has been disabled by typing : vol status [name of vol]

vol2