Month: June 2014

Setting up Data Protection on Tintri T540 – Replicate and Restore

If you read my earlier post about Tintri’s VMstore T540 you know that setting up data protection on the T540 is very simple. There is not much to it really just a few simple clicks and you’re replicating between applicances.  Once you set the Replication settings ( assigning the replicating partner and password) and add the purchased license on the appliance you are ready to configure the vms for protection.

Follow the below settings to setup replication of a vm and restore it on another T540. You’ll find that it’s very simple to setup and takes just a few minutes.


Add Replication settings to appliance

Fig4_TintriD

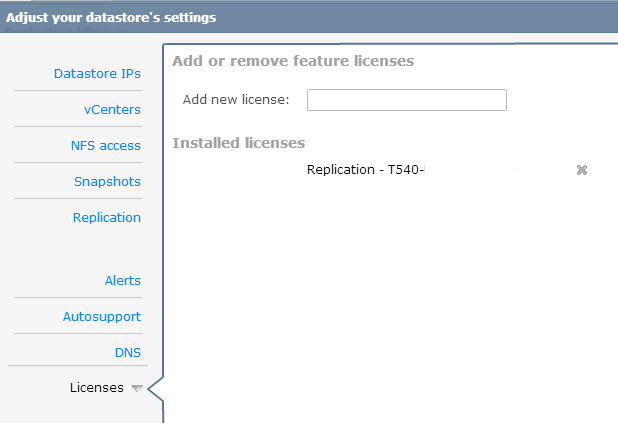
Add Replication License

Fig3_TintriC


 Configuring VMs for Snapshot & Replication to another T540

  1. Login to your T540 using the url of the appliance http://x.x.x.x/
  2. Click on “Search VM” link (top right)
  3. A listing of all the VMs will be shown
  4. Find the Virtual Machine you wish to protect and right click and select Protect. Select Protect
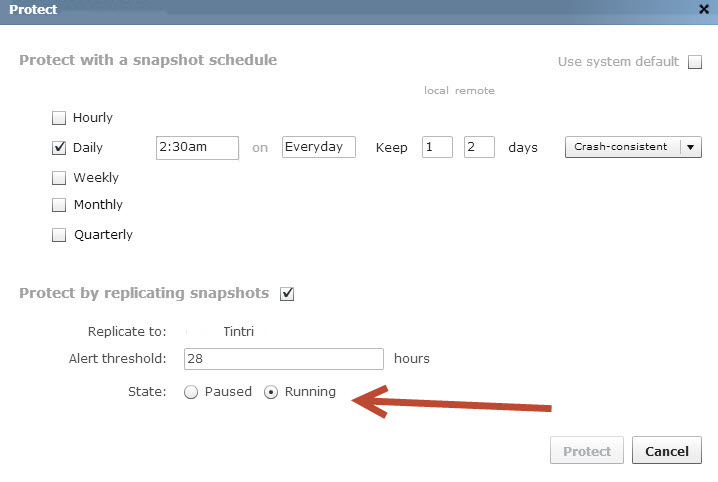
  5. Select the snapshot schedule, retention period, and if you want the snapshot to be replicated and the alert threshold. When you are completed Click on Protect.Tintri_ReplicateA
  6. To verify the replication state, on the Virtual Machine list right click on the header bar and select Data Protection. This will refresh the Protection tab showing the replication state, schedule and retention.Tintri_ReplicateB


 Restoring a Replicated VM on another T540

  1. Login to T540 hosting snapshot using the url of appliance http://x.x.x.x/
  2. Click on “Search VM” top right
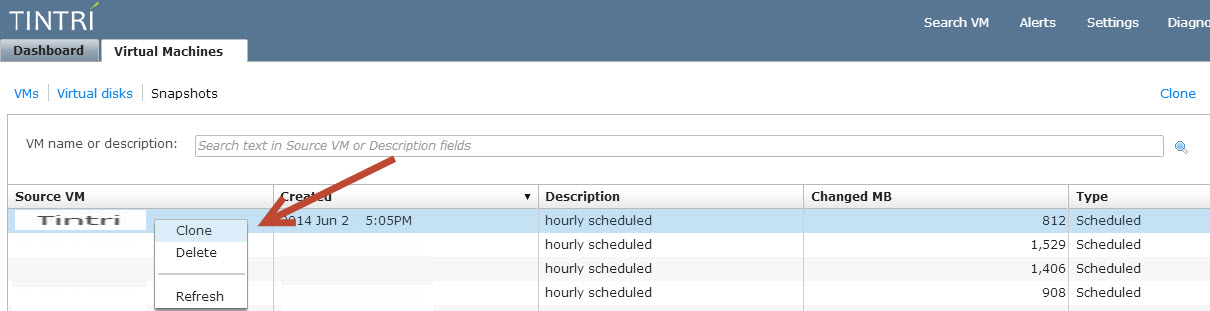
  3. A listing of all the VMs will be shown. Click on Snapshots and this will lists all snapshots held on the appliance.Tintri_Snapshot
  4. Locate the snapshot you want to recover. Right click and select Clone.Tintri_Restore
  5. Create new Virtual Machine window will open. Fill out the required fields and click Clone. The window appear at the bottom right informing you that the Virtual Machine is being added to the inventory.Tintri_RestoreA
  6. Sign into vCenter and find the Virtual Machine that you just cloned complete any needed configuration changes and power on.


Advertisement

Tintri T540 – Simple VM storage management

It’s the storage wars. Lots of new vendors on the storage array market doing their dog and pony show,  trying to get pieces of the pie over familiar giants like NetApp and EMC. Having  managed NetApp for a few years I was comfortable with their Filers so why change?

After spending a few years managing our VMware and it’s storage, our environment had grown and  started to show some performance bottlenecks. We needed to find a solution that would meet the demanding IO needs of our VMs  and  support the HA and DR requirements for our datacenter. This is where we decided to think outside of the box and look at all the new players in the storage industry. We started doing research and eventually decided on Tintri and their VMstore T540 appliance. If you haven’t heard of Tintri before they are a flash based storage array that was designed just to be used for datastore use of VMs. It’s purpose in life is storing VMs ,making it run better and faster. The storage array is designed to not only meet the demanding IO needs of VMs but also reduce the complexity of managing the storage the VMs.

The T540 not only met our requirements but also gave us simple storage management. Even though there isn’t very much to manage with the array it still offers features that were key to us such as NFS , hot cloning VMs, deduplication, compression and hardware replication. Tintri supports VMware vSphere 4.x and 5.x  using NFS, RHEVand even HyperV. VDI deployments of VMware Horizon View and Citrix XenDesktop can also run on Tintri.

The Tintri VMstoreT540 is a 3U rackmounted appliance that comes with:

  • Capacity: 26.4 TB (8x 300 GB SSD + 8 x 3 TB HDD) with 13.5TB usable space
  • Management Networking :  2x 1GbE (RJ-45)
  • Data Network : Option 1: 2x 10GbE (10GBASE-SR LC fibre or SFP+ direct attach copper) or  2: 2x 10GbE (RJ-45)
  • Replication Network: Optional: 2x 1GbE (RJ-45) or 2x 1GbE (SFP)

From start to finish it takes about 30 – 60 minutes to rack the appliance ( dependent on how fast you can rack it) in the datacenter and connect to vCenter. There is very little day to day management with the T540. Tasks such as  Hot cloning VMs and setting up replication takes minutes and is effortless. Once the T540 is racked you give it an IP address and you are off to configuring the appliance to connect to vCenter.

Easy and Simple

The following screenshots of the appliance’s settings  will show you how easy and simple it is to setup.

Datastore IP is just that, it where you assign the appliance with the IP address that the datastore will used when connected to vCenter
Fig1_TintriA

Datastore IP


Setup Snapshot schedules using the Snapshot tab
Fig2_TintriB

Snapshot Configuration


After supplying the Licenses for replication shown in Fig3_TintriC you can setup replication to another T540 shown in Fig4_TintriD
Fig3_TintriC

Replication License


Fig4_TintriD

Replication Settings


Wow! I sound like an commercial for Tintri. There is no paid endorsement here, it’s just the  truth, the thing just works and does a great job at what it was designed to do. It runs just like they say it does.

To learn more about the Tintri and the their other products the VMstore T620 and T650 check out  Tintri’s website.

Don’t Forget to Assign Ownership to Disks on your Netapp Filers

The other day a co-worker was doing his rounds in the data center, sent the team an email with (photos attached) indicating amber lights on one of the shelves of our Netapp Filer.  Amber lights on a shelf of disk on your SAN usually isn’t a good thing so I jumped onto OnCommand System Manager to begin the troubleshooting.It didn’t take me very long to figure out the problem because the first thing I see after I am logged into OnCommand was a warning that I had “unowned disks”.

The aha moment hit me, just the day before we had 2 disks fail and were replaced via the configured Autosupport. Gosh, I do like the autosupport. Having a disk go bad overnight then getting a replacement before you even walk through the door is very convenient.

When these particular disks were replaced by another co-worker the day before, he had removed the bad disks and inserted the replacement disks. Since our filers are setup with software disk ownership , with disk auto assign disabled, the disks were not assigned automatically to an owner.  Ownership must be assigned for disk(s) before the filer can use them otherwise they are useless and flash amber lights at you.

To assign ownership to the disk(s) SSH into your Filer and do the following :

  1. You will need to locate the disk(s) that don’t have any owners. Type the following command
    disk show -n
  2. Once you have the disk name of the unowned disk you assign ownership with this command:
    disk assign <disk_name>
    disk assign 0b.16
    for multiple disks < disk assign 0b.43 0b.24 0b.27
    or
    Assign ownership for all unowned disks at once < disk assign all
  3. Run disk show -v to verify the disk assignments

So there you go, a pretty simple fix. Next time you replace a failed drive don’t forget to give it an owner!

Remove Hidden Devices From Servers

One of the things I do after a successful P2V of a server is do some cleanup on the newly virtualized server. Cleaning up involves uninstalling any software , such as Broadcom  and Dell Open Manage software, that is no longer needed for the server. I also perform clean up of the any old or removed devices through the servers Device Manager that may still be lingering around. Removing these hidden or ghost devices can prevent or  fix any issues you may have with the vm.

To remove the hidden devices you will need to go to Device Manager and tell it to Show Hidden Devices, the devices will be displayed in a lighter shade than the installed devices. However, after performing many P2Vs , I found out that Device Manager doesn’t display all the devices that server may have had at one point.

Fig1.Hidden

Fig1.Hidden


Fig2.Hidden

Fig2.Hidden


One would think by selecting this view everything would magically appear based on the fact that we just told Device Manager to “show hidden devices”. Since we are dealing with Windows and something that would be logical isn’t, we can the modify the registry  to see these “hidden” devices . Once the registry value has been added ,reboot the server then you will be able to see all those hidden devices that were never uninstalled and you can properly uninstall them.

Add the following Registry Settings

Registry Settings
System Key: [HKEY_LOCAL_MACHINE\SYSTE\CurrentControlSet\Control\Session Manager\Environment]
Value Name: DEVMGR_SHOW_NONPRESENT_DEVICES
Data Type: REG_SZ (String Value)
Value Data: (1 = show all hidden devices)

Fig3. Hidden

Fig3. Hidden


After Rebooting the server go back into Device Manager < Select Show Hidden Devices again and you will now see the hidden devices shaded lighter.

Fig4. Hidden

Fig4. Hidden


To remove a device , right click on the device and select uninstall.

Fig5. Hidden

Fig5. Hidden


You may be prompted to confirm that you want to remove the device , select OK and the device will be removed.

Fig6. Hidden

Fig6. Hidden


You can remove hidden devices  on VMs or even physical servers  that has been running for a while as part of overall server maintenance plan to keep your servers running in tip top shape.