vmware

Tintri T540 – Simple VM storage management

It’s the storage wars. Lots of new vendors on the storage array market doing their dog and pony show,  trying to get pieces of the pie over familiar giants like NetApp and EMC. Having  managed NetApp for a few years I was comfortable with their Filers so why change?

After spending a few years managing our VMware and it’s storage, our environment had grown and  started to show some performance bottlenecks. We needed to find a solution that would meet the demanding IO needs of our VMs  and  support the HA and DR requirements for our datacenter. This is where we decided to think outside of the box and look at all the new players in the storage industry. We started doing research and eventually decided on Tintri and their VMstore T540 appliance. If you haven’t heard of Tintri before they are a flash based storage array that was designed just to be used for datastore use of VMs. It’s purpose in life is storing VMs ,making it run better and faster. The storage array is designed to not only meet the demanding IO needs of VMs but also reduce the complexity of managing the storage the VMs.

The T540 not only met our requirements but also gave us simple storage management. Even though there isn’t very much to manage with the array it still offers features that were key to us such as NFS , hot cloning VMs, deduplication, compression and hardware replication. Tintri supports VMware vSphere 4.x and 5.x  using NFS, RHEVand even HyperV. VDI deployments of VMware Horizon View and Citrix XenDesktop can also run on Tintri.

The Tintri VMstoreT540 is a 3U rackmounted appliance that comes with:

  • Capacity: 26.4 TB (8x 300 GB SSD + 8 x 3 TB HDD) with 13.5TB usable space
  • Management Networking :  2x 1GbE (RJ-45)
  • Data Network : Option 1: 2x 10GbE (10GBASE-SR LC fibre or SFP+ direct attach copper) or  2: 2x 10GbE (RJ-45)
  • Replication Network: Optional: 2x 1GbE (RJ-45) or 2x 1GbE (SFP)

From start to finish it takes about 30 – 60 minutes to rack the appliance ( dependent on how fast you can rack it) in the datacenter and connect to vCenter. There is very little day to day management with the T540. Tasks such as  Hot cloning VMs and setting up replication takes minutes and is effortless. Once the T540 is racked you give it an IP address and you are off to configuring the appliance to connect to vCenter.

Easy and Simple

The following screenshots of the appliance’s settings  will show you how easy and simple it is to setup.

Datastore IP is just that, it where you assign the appliance with the IP address that the datastore will used when connected to vCenter
Fig1_TintriA

Datastore IP


Setup Snapshot schedules using the Snapshot tab
Fig2_TintriB

Snapshot Configuration


After supplying the Licenses for replication shown in Fig3_TintriC you can setup replication to another T540 shown in Fig4_TintriD
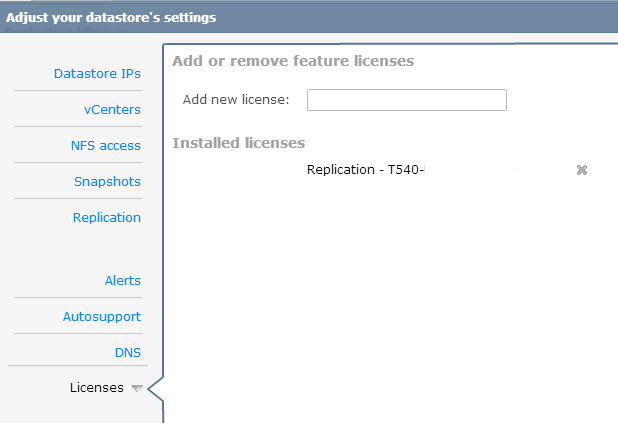
Fig3_TintriC

Replication License


Fig4_TintriD

Replication Settings


Wow! I sound like an commercial for Tintri. There is no paid endorsement here, it’s just the  truth, the thing just works and does a great job at what it was designed to do. It runs just like they say it does.

To learn more about the Tintri and the their other products the VMstore T620 and T650 check out  Tintri’s website.

Advertisement

Remove Hidden Devices From Servers

One of the things I do after a successful P2V of a server is do some cleanup on the newly virtualized server. Cleaning up involves uninstalling any software , such as Broadcom  and Dell Open Manage software, that is no longer needed for the server. I also perform clean up of the any old or removed devices through the servers Device Manager that may still be lingering around. Removing these hidden or ghost devices can prevent or  fix any issues you may have with the vm.

To remove the hidden devices you will need to go to Device Manager and tell it to Show Hidden Devices, the devices will be displayed in a lighter shade than the installed devices. However, after performing many P2Vs , I found out that Device Manager doesn’t display all the devices that server may have had at one point.

Fig1.Hidden

Fig1.Hidden


Fig2.Hidden

Fig2.Hidden


One would think by selecting this view everything would magically appear based on the fact that we just told Device Manager to “show hidden devices”. Since we are dealing with Windows and something that would be logical isn’t, we can the modify the registry  to see these “hidden” devices . Once the registry value has been added ,reboot the server then you will be able to see all those hidden devices that were never uninstalled and you can properly uninstall them.

Add the following Registry Settings

Registry Settings
System Key: [HKEY_LOCAL_MACHINE\SYSTE\CurrentControlSet\Control\Session Manager\Environment]
Value Name: DEVMGR_SHOW_NONPRESENT_DEVICES
Data Type: REG_SZ (String Value)
Value Data: (1 = show all hidden devices)

Fig3. Hidden

Fig3. Hidden


After Rebooting the server go back into Device Manager < Select Show Hidden Devices again and you will now see the hidden devices shaded lighter.

Fig4. Hidden

Fig4. Hidden


To remove a device , right click on the device and select uninstall.

Fig5. Hidden

Fig5. Hidden


You may be prompted to confirm that you want to remove the device , select OK and the device will be removed.

Fig6. Hidden

Fig6. Hidden


You can remove hidden devices  on VMs or even physical servers  that has been running for a while as part of overall server maintenance plan to keep your servers running in tip top shape.

P2V’d VM fails to boot with incorrect disk controller

VMware converter tool is a really nice tool to convert physical server to virtual machines. It’s free and fairly simple to use. The majority of time that I have used it I have not had any issues but a recent issue where a P2V’d vm failed to boot inspired me to write this blog posting.

Back in 2010 when I was first implementing virtualization at my company, I ran into an issue with a P2V of aW2K8 server that wouldn’t boot up after completion. The VM would go into a continuous loop of blue screens and reboots. This was very annoying and made it difficult to determine the source of the problem.

The blue screen error gave the generic error that hardware on the server changed. DUH…I just P2V’d you from a Dell M610 blade so of course your hardware has changed, you silly server. The fun part was finding out what the server didn’t like about this change to cause it to blue screen.

The blue screen error code indicated something with the disk had been changed. With that lead I started looking at all of the VM settings, in particular the disk settings.  I noticed that the SCSI controller was set to Paravirtualized SCSI which was different from all of the other VMs I had P2V’d that day.  Their controllers were set as LSI Logic controllers.

I figured something must have become confused during the conversion of this blade, so I changed the SCSI controller on the VM to LSI Logic SAS within the vSphere client. The settings change worked, and the VM powered up normally.

Fast forward to August 2013 when I encountered a similar problem. This time I was converting a Dell 1855 blade running Windows Server 2003 R2 which also suffered from the infamous blue screen reboot loop. Having seen this issue before, I checked the SCSI controller setting and found that it had been converted as an IDE controller. Server operating systems are not compatible with IDE controllers so this VM was not going to boot unless I changed the adapter controller. When I attempted to change the disk type using the vSphere client, however, the option was not available.

ide1

A quick search on the internet led me to VMware KB article 1016192 (Converting a virtual IDE disk to a virtual SCSI disk).According to the article, if no controller is selected during the conversion process, the VM is created with an IDE controller for the VM’s system drive.

To fix the issue you have two options:

1.      Re-run the conversion, making sure you select a controller type. Do not leave it set to the default of auto-select.

2.      Manually change the adapter type inside the vmdk file.

I was under a time constraint and did not have time to re-run the P2V, so I opted to manually change the controller type. Using the instructions from the article, I was able to successfully change the controller.

To manually change the disk controller type I used the following steps:

Login to the host where the VM resides. If SSH is not enabled, you will need to enable that option before you can connect.

  1. Once logged onto your server navigate to the datastore path of the VM.

# cd /vmfs/volumes/<datastore_name>/<vm_name>/     ide8

  1. Using the vi editor, open the vmdk file of the VM with the following command.

vi nameofserverfile.vmdk

  1. Find the line that says :ddb.adapterType = “ide”ide6
  2. Change the adapter type to LSI Logic,

(type r over a letter then the replacement character until all the characters have been replaced with)
ddb.adapterType = “lsilogic” ide7

  1. Press the ESC key, then :wq to save the file.
  2. From vSphere Client:
    1. Click Edit Settings on the VM.
    2. Select the IDE virtual disk and remove it from the VM but DO NOT delete the disk.  ide2
  1. After the disk has been removed, you will need to go back into settings and re-add the disk.
    1. Click Add > Hard Disk > Use Existing Virtual Disk. ide3
    2. Navigate to the location of the disk you just removed and select to add it to the VM.
    3. Choose the same controller type from step 4. The SCSI ID should read SCSI 0:0. ide4 ide5

Expanding System Drive of a running W2K3 VM using EXTPART

At some point in time a VM will run low on disk space and you’ll need to add more space to it. For VMs running Windows server 2008 this isn’t an issue but anything older, well , you had to use tools such as DiskPart to get the job done. Let’s say the system drive was running low, for W2K3 servers, this was a little bit harder to expand because you needed to shutdown the VM. Depending on what you were running on that VM getting that shutdown approval could take an act of congress to pass. Expanding the system drive on a running W2K3 VM is not impossible though, for I have the solution that could solve those woes.

A few years ago when my company was just getting started on our virtualization infrastructure (VMware of course) I became familiar with a nice little tool that would expand drives on the fly for VM’s running W2K3 or older. This was pretty important considering over 80% of our servers at the time were still on W2K3. What’s this magical tool that can save us admins from having to shutdown a VM because the users hoarded all the space?

Dell’s EXTPART. I will tell you that there is no guarantees with this and use at your risk. Since I’m a daring person , well honestly, just don’t want to go asking to shutdown the server, I’ve used this tool. I have used it quite often too. I’m still alive, the servers survived, and half the time they didn’t even know they were low on space because I proactively fixed the problem.

Now, this isn’t the magical tool that fixes everything because it does have some caveats. For instance, you can only expand system drives on while running if the VM was not P2V’d. If the VM’s were built from scratch or from a template this tool works great but if your VM was P2V’d you need to reboot into safe mode to expand the system drive. Expanding non system drives while running is perfectly fine on P2V’d VMs using EXTPART.

To use this EXTPART do the following:

  1. To use EXTPART to expand a drive you will first need to download the tool and save it to a location on the VM. The tool can be found here
  2. In vSphere, go to the settings of your VM and increase the Hard disk that you want to expand. If it’s the system drive then most likely you will want Hard disk1.
  3. EXTPART_1

  4. Now go to your VM, open a Command Prompt and navigate to the directory where you saved the download.
  5. Once you are in the file directory of EXTPART, run the extpart.exe file
  6. You will be prompted to type in the Volume or Drive that you want to expand, type in C:
  7. After putting the volume it will display the details of the drive, such as volume and partition size, and ask how much you want to expand the drive. At this point enter in the size (MB) that you want to expand the drive by. This is the amt you are increasing the drive with not the total size of the drive.
  8. EXTPART_2

  9. Once complete press enter and the size of the increased volume will be displayed.
  10. If this fails with an error that “the disk is not accessible” then most likely the VM was P2V’d and you will need to reboot the VM into safe mode. Once booted into safe mode start at step 3 again.

So there you have it, an expanded drive on a running W2K3 VM. No time downtime and you look like a hero for expanding the drive. #WINWIN