Tips & Tricks

P2V’d VM fails to boot with incorrect disk controller

VMware converter tool is a really nice tool to convert physical server to virtual machines. It’s free and fairly simple to use. The majority of time that I have used it I have not had any issues but a recent issue where a P2V’d vm failed to boot inspired me to write this blog posting.

Back in 2010 when I was first implementing virtualization at my company, I ran into an issue with a P2V of aW2K8 server that wouldn’t boot up after completion. The VM would go into a continuous loop of blue screens and reboots. This was very annoying and made it difficult to determine the source of the problem.

The blue screen error gave the generic error that hardware on the server changed. DUH…I just P2V’d you from a Dell M610 blade so of course your hardware has changed, you silly server. The fun part was finding out what the server didn’t like about this change to cause it to blue screen.

The blue screen error code indicated something with the disk had been changed. With that lead I started looking at all of the VM settings, in particular the disk settings.  I noticed that the SCSI controller was set to Paravirtualized SCSI which was different from all of the other VMs I had P2V’d that day.  Their controllers were set as LSI Logic controllers.

I figured something must have become confused during the conversion of this blade, so I changed the SCSI controller on the VM to LSI Logic SAS within the vSphere client. The settings change worked, and the VM powered up normally.

Fast forward to August 2013 when I encountered a similar problem. This time I was converting a Dell 1855 blade running Windows Server 2003 R2 which also suffered from the infamous blue screen reboot loop. Having seen this issue before, I checked the SCSI controller setting and found that it had been converted as an IDE controller. Server operating systems are not compatible with IDE controllers so this VM was not going to boot unless I changed the adapter controller. When I attempted to change the disk type using the vSphere client, however, the option was not available.

ide1

A quick search on the internet led me to VMware KB article 1016192 (Converting a virtual IDE disk to a virtual SCSI disk).According to the article, if no controller is selected during the conversion process, the VM is created with an IDE controller for the VM’s system drive.

To fix the issue you have two options:

1.      Re-run the conversion, making sure you select a controller type. Do not leave it set to the default of auto-select.

2.      Manually change the adapter type inside the vmdk file.

I was under a time constraint and did not have time to re-run the P2V, so I opted to manually change the controller type. Using the instructions from the article, I was able to successfully change the controller.

To manually change the disk controller type I used the following steps:

Login to the host where the VM resides. If SSH is not enabled, you will need to enable that option before you can connect.

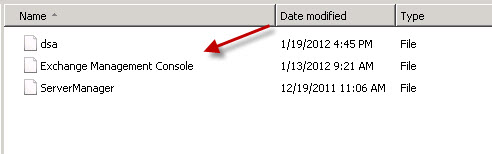
  1. Once logged onto your server navigate to the datastore path of the VM.

# cd /vmfs/volumes/<datastore_name>/<vm_name>/     ide8

  1. Using the vi editor, open the vmdk file of the VM with the following command.

vi nameofserverfile.vmdk

  1. Find the line that says :ddb.adapterType = “ide”ide6
  2. Change the adapter type to LSI Logic,

(type r over a letter then the replacement character until all the characters have been replaced with)
ddb.adapterType = “lsilogic” ide7

  1. Press the ESC key, then :wq to save the file.
  2. From vSphere Client:
    1. Click Edit Settings on the VM.
    2. Select the IDE virtual disk and remove it from the VM but DO NOT delete the disk.  ide2
  1. After the disk has been removed, you will need to go back into settings and re-add the disk.
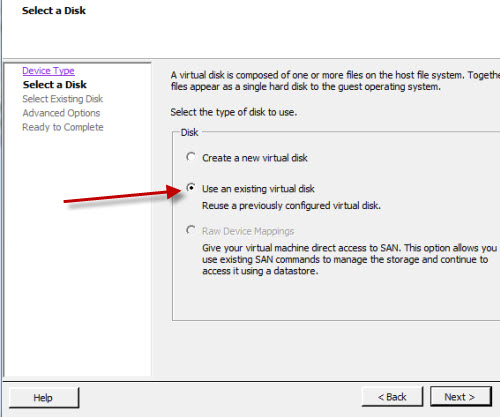
    1. Click Add > Hard Disk > Use Existing Virtual Disk. ide3
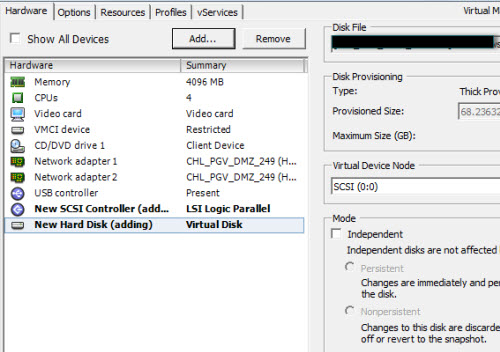
    2. Navigate to the location of the disk you just removed and select to add it to the VM.
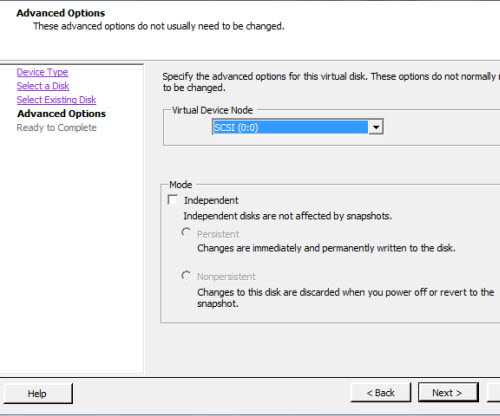
    3. Choose the same controller type from step 4. The SCSI ID should read SCSI 0:0. ide4 ide5
Advertisement

SnapManager for Exchange fails to run scheduled snaps after running an upgrade to 6.0.4

Sometimes fixes & patches introduce another set of issues that will give way to another set of new patches and fixes.

In our case, it was our upgrade to SnapManager for Exchange( SME) 6.0.4 which had fixes to some bugs we were facing. Everything seemed to go real well, all the upgrades on the Exchange 2010 DAG member servers didn’t hiccup one bit. This was too good to be true, an upgrade of SME and no issues so far. I had my fingers crossed and was hoping for the best, maybe luck would be in our corner.

No Joy…

After completing the upgrade on all servers I needed to run a test of some exchange snaps. Got to make sure it works right? I first started out running manual snaps on all the databases on each node. Those worked great, No Problems.

So onward to the next test which was to kick off a scheduled snap of the DAG databases. After kicking off a scheduled snap through task scheduler the snaps failed to run. After some digging around and a few more tests, my co-worker discovered that there is bug when you upgrade to SME 6.0.4 which causes scheduled snaps to fail.

According to Netapp’s KB 649767 article it has to do the value “0” is not selectable in the “retain up-to-the-minute restorability” option in the GUI of this release like it was in previous releases.  When running the snaps through the GUI of SME 6.0.4 , you can manually enter the value “0” and the run the job immediately, backups will work. The issue occurs when SME creates a scheduled job; it creates the job with wrong parameter , it be should be NoUtmRestore if you don’t want to retain any transaction logs.

http://support.netapp.com/NOW/cgi-bin/bol?Type=Detail&Display=649767

SME604_a

Getting Backups to work again…

To get scheduled backups to work again you will need to do one of 2 things:

  • Change the -RetainUTMDays and -RetainUTMBackups from something other than “0”. Changing the value to something other than “0” will retain your transaction logs for the specified value
  • If you don’t want to keep any transaction logs, manually modify the scheduled job and remove the -RetainUTMDays or -RetainUTMBackups parameters then replace with NoUtmRestore.
    • If you are running a DAG remember you will need to modify the scheduled job across all DAG members that have the scheduled job.

SME604

Using Custom Filters For Your Exchange Dynamic Distribution Groups

Dynamic Distribution groups are Distribution groups that dynamically add members into the group based on a certain set of filters and conditions, when an email is sent to the group. These are great for mass mailing a group of users that change can often and managing the group manually would be difficult to maintain.

Exchange offers 2 ways of creating these groups; you can use the EMC/ EAC or PowerShell. I have found that the majority of cases for Dynamic Distribution can be created using the EMC/EAC, which offers the following set of pre-canned filters and conditional.

  • IncludedRecipients
  • ConditionalCompany
  • ConditionalDepartment
  • ConditionalStateOrProvince
  • ConditionalCustomAttribute( 1–15)

There are times that this pre-canned list just doesn’t fit the bill. Let’s say you need a Dynamic Group that filters on users from a certain country or even a particular job title?  PowerShell to the rescue!

PowerShell offers the pre-canned filters as well as any of the account attributes that a user account would have, giving you a lot more freedom to create some customized Dynamic Distribution Group. Please note that you cannot combine pre-canned conditional filters and custom Recipient Filters in the same query.

For example, to create a Dynamic group for mailbox users only in a particular country and company, let’s say the US, use the following cmdlet:

New-DynamicDistributionGroup -Name "TestGroup" -Alias "TestGroup" -OrganizationalUnit "your/OU"-RecipientFilter {(RecipientType –eq  “UserMailbox”) -and (CountryOrRegion –eq “United States”) -and (Company –eq “mycompany”)}

If you have an existing group that you just need to modify to become custom use the Set-DynamicDistributionGroup cmdlet:

Set-DynamicDistributionGroup -Identity "TestGroup" -RecipientFilter {(RecipientType –eq  “UserMailbox”) -and (CountryOrRegion –eq “United States”) -and (Company –eq “mycompany”)}

Note that when creating your Dynamic Distribution Group using PowerShell you cannot combine pre-canned conditional filters and custom Recipient Filters. A list of all the available filterable properties  parameters can be found on TechNet’s site.

http://technet.microsoft.com/en-us/library/bb738157(v=exchg.150).aspx

Exchange 2010 and Active Directory Operation Failed on DC errors

An annoying problem that I have seen since we upgraded to Exchange 2010 is when in the Exchange Management Console (EMC) , you are not able to perform certain tasks because a DC could not be contacted .The domain controller in the error is usually one that has been demoted from your environment but sometimes not.  The issues can also occur after recent changes to a DC, which causes the EMC to lose contact with the Domain Controller

When this particular scenario was first noticed , it puzzled us because the DC in question  was still  running and Exchange was able to discover it. We did all the typical AD and exchange troubleshooting steps, checked permissions, AD replication, etc., but none these steps fixed the issue, the tech was still not able to create accounts.  After some more digging around we later found out some FSMO roles were removed from that DC. Aha! A major change to the DC.

Common error messages may contain  “Active Directory operation failed on Dcxxxx” or “ LDAP server was unavailable”. When the problem occurs  you are not able to perform certain actions in the EMC, such as creating accounts, mailbox moves, basically any operation that requires contact with the DC.

 An example of an error is shown below:

EMC

So what’s the problem you ask?

The problem is a result of the Exchange Management Console caching the domain controller details in the MMC temp files. It caches the data but it’s not smart enough to update the data or locate another DC. To fix the issue you have to remove the MMC cache file from the users profile.

Use the following steps to clear the EMC MMC cache file:

1. Close the EMC if you have it open
2. Go to the User’s profile directory and delete the Exchange Management Console file.
3. File location can be found here:

      • C:\users\<specific user>\AppData\Roaming\Microsoft\MMC\Exchange Management Console

EMC2

4. Reopen the EMC

See Microsoft KB article http://support.microsoft.com/kb/2019500

Manage Calendar Sharing Permissions in Outlook Web App 2010

I often hear from users that they don’t like to use Outlook Web App  for email because they can’t see shared calendars.  I then inform the user that things have changed since the days of Exchange 2003. A nice added feature of Outlook Web App 2010( Outlook Web Access) is that you can use the Change Sharing Permissions within Outlook Web App to view the people you’ve shared your calendar with and the permissions they have. This also gives you the ability to stop sharing your calendar. Now you can’t use Outlook Web App  to give someone else permission to change your calendar, but you can use the Delegate Access feature in Outlook to give other people in your organization permission to make changes to your calendar and to respond to meeting requests on your behalf.

To Modify Calendar Sharing Permissions :

  1. In Outlook Web App, click Calendar in the Navigation Pane.
  2. Click Share on the Calendar toolbar.
  3. Click Change Sharing Permissions and then, in the Calendar dialog box, select the name of the calendar that you want to change sharing permissions for.
  4. Click the name of the person whose permissions you want to change.
  5. Click Edit and select the permissions you want.
  6. Click Save to save your change.

How to stop sharing a calendar:

If you want to stop sharing your calendar with someone:

  1. In Outlook Web App, click Calendar in the Navigation Pane.
  2. Click Share on the Calendar toolbar.
  3. Click Change Sharing Permissions and then, in the Calendar dialog box, select the name of the calendar that you want to stop sharing.
  4. Click the name of the person you want to stop sharing your calendar with to select it, and then click .
  5. Click Yes to confirm that you want to delete that person from the list, or click No to cancel.

So there you have it. Next time a user says they don’t like to use OWA because they can’t manage or see shared calendars you can let them know that’s not the case anymore.

Failed Login to Netapp Filer using SSH/Putty

Netapp filers can be accessed and managed many ways, including using Putty to SSH into the filer itself.  In addition to FilerView, there is also another web based tool called Netapp OnCommand  System Manager that is GUI based which gives a very nice graphical performance chart detailing how HOT your filers are running. The OnCommand tool is great for everyday management of the filers but sometimes you will need to access the filers via Putty to run more advanced functions , ie. killing a NDMP session that is hung.

We had an interesting issue today while trying to access one of our Netapp filers using Putty. Every time we would we try try to log  into the filer with a Putty session we would get an access denied or the Putty session would simply close. What was odd was that it didn’t happen for all of the us Storage Engineers. Thinking that maybe are accounts are locked or maybe  the access got removed I started the OnCommand session and attempted to log into the filers.

Not a single hiccup. Logged in right away on every single filer we have. hmmm….so I can log in with my credentials using OnCommand but when using a Putty session I can’t. Yet, another storage engineer can login to both and we all have the same permissions. All filers were checked for locked accounts including Active Directory, nothing was locked.

After some more head scratching one of the other Storage Engineers stumbled upon a setting within the OnCommand System Manager setting that was caching our passwords. Once the tick box to cache passwords was cleared we were able to  successfully log onto the filers.

To remove the cache passwords in OnCommand :

  1. Run OnCommand System Manager and log onto any filer
  2. In the top left hand corner select to Tools
  3. Select Options         

oncommand
4. Clear the Enable Cache Passwords tick box

Oncommand2

  1. Select Clear Existing Passwords

  2. Select Save and Close

Once the settings were changed we were both able to Putty to the filers. Gotta Love the gotchas of cached passwords.

Delivery Reports for your email messages in Exchange 2010

Have you ever gotten a ticket requesting if a particular email sent was delivered ? Or did our trusty Administrative assistant need to make sure that everyone received the latest company memo she just sent?

Well, with Exchange 2010, mailbox users can now do their own delivery reports.  Since we’ve upgraded to Exchange 2010 I refer all my users with  tracking requests to use the new Delivery reports available for them in OWA. The Delivery Reports can be used to search and get delivery information about messages sent by you or sent to you. If you sent a message to five people, for example, you can check the status of the delivery of that message to each person. Delivery reports is only available in OWA and is not accessible using any version of the outlook client. Once a result is viewed a users has the option to send the report to any email address of they choose.

Another added bonus with this feature, it even tracks the message once it’s in the mailbox. For example, User A indicated that she sent an email to User B and User C, but only User B said he received the email. User C insisted they never received the email and there must be an issue with our Exchange servers. I assured them there was nothing wrong with the mail servers and there had to be a valid explanation as to why he was not receiving the email. I walked User A through on how to run a Delivery report on her email messages she sent to User B and User C. The results of her search not only confirmed that BOTH User B and User C received her email but it also showed that User C had moved the email to the deleted items folder. OH Snap!

How to run a Delivery Report:

  1. To access Delivery reports you or the User must login to your Exchange 2010 OWA site with your required credentials
  2. Click Options
  3. See All Options > Organize E-Mail
  4.  Delivery Reports
    • You can search for reports on messages you’ve sent by using the Search for messages I’ve sent to box.
    • You can use the Search for messages I’ve received from box to search for delivery information about messages someone has sent to you.
  5. Once required fields are filled in and the results are found, you can double-click on a result to see more details.

Delivery reports are a nice added feature made available to users with Exchange 2010. I personally think that this is way better than sending those awful read receipts for internal emails,  which generate even more unneeded traffic.

Have a great night!- Until next time.

Performing Mailbox exports in Exchange 2010

This post is dedicated to a few of our techs that will stay nameless to protect the innocent (or guilty) because it seems that they forget how to export mailboxes when they get a request to do one. Don’t worry, I still love you guys and I totally understand on forgetting how to do something if you don’t do it everyday. Repetition is key and when you don’t export mailboxes everyday it’s easy to forget.

So the next time you guys come to me and ask “Can I export a mailbox and if so, how do I do that?”  , I will simply refer you to this post.  I’m only going to post 2 of most commonly requested cmdlets, but for more detailed information on Managing Mailbox Import and Export Requests on Exchange 2010 visit Microsoft’s Technet here.

Prerequisites:

  •  Mailbox exports can only be performed using EMS ( Exchange Management Shell), they cannot be exported using the EMC
  • To be able to export a mailbox one must have the  Mailbox Import Export management role assigned to them or be added to the built-in Discovery Management Role Group in Exchange 2010.
  • You need to create a network shared folder to place the exports
  • The account running the export should have appropriate permissions to access to the network share to view the files when completed.
  • The Exchange Trusted Subsystem group should be granted read/write permission on the network share. Please note:  If you don’t grant this permission, you’ll receive an error message stating that Exchange is unable to establish a connection to the target mailbox.

Exporting Mailboxes

  • Log onto a system that has EMS installed
  • Type the following cmdlets or you can copy and paste directly from this post.

To export the whole  mailbox:

New-MailboxExportRequest  “mailbox alias”  -FilePath  “\\filepathfor yourexport\nameofpst.pst”

To export data from the well-known folders in a mailbox. The list of well-known folders can be found on the Technet site

New-MailboxExportRequest  “mailbox alias”  -IncludeFolders “#Inbox#” -FilePath  “\\filepathfor yourexport\nameofpst.pst”

The export will take some time to complete – this all depends on how big the mailbox is. Once complete go to the mailbox export network share and copy the pst to any location you want to store it at.

After the export is completed you will need to do some clean up to remove the export request because it is not automatically cleared.

Removing the Export Request

  • Type the following cmdlet or you can copy and paste directly from this post.

Remove-MailboxExportRequest -identity “user\mailboxexport”

And there you have it! Mailbox exports aren’t painful at all. Like with any powershell cmdlets you can copy these cmdlets and save to a text file. When you need it again just simply modify the names then do a copy and paste directly to EMS.

How to set an Out of Office Message in Powershell

Something that I get asked quite often from our techs is  “can I set Userxx’s Out of Office message?”. Luckily with Exchange 2010, any tech or admin with the correct permissions can easily do that. There are 2 ways ; via the Exchange Control Panel( ECP) or through Powershell. I personally think it’s easier to do it through the shell but the ECP has it advantages too. For instance the ECP can be accessed on any web browser and if you’re configured correctly you can even access it outside of your internal company network.

If you’re like me and you like quick & easy then using Powershell maybe the method for you. To set the OOF using Powershell run the following commands.

Set-MailboxAutoReplyConfiguration pschmitt@youremail.com –AutoReplyState Scheduled –StartTime “1/8/2013” –EndTime “1/15/2013” –ExternalMessage “Type External OOF message here” –InternalMessage “Type Internal OOF message here

You can save this command in a text file and next time you need to set the OOF simply modify the email address and message then copy & paste directly in powershell.

Now wasn’t that simple?