At some point in time a VM will run low on disk space and you’ll need to add more space to it. For VMs running Windows server 2008 this isn’t an issue but anything older, well , you had to use tools such as DiskPart to get the job done. Let’s say the system drive was running low, for W2K3 servers, this was a little bit harder to expand because you needed to shutdown the VM. Depending on what you were running on that VM getting that shutdown approval could take an act of congress to pass. Expanding the system drive on a running W2K3 VM is not impossible though, for I have the solution that could solve those woes.
A few years ago when my company was just getting started on our virtualization infrastructure (VMware of course) I became familiar with a nice little tool that would expand drives on the fly for VM’s running W2K3 or older. This was pretty important considering over 80% of our servers at the time were still on W2K3. What’s this magical tool that can save us admins from having to shutdown a VM because the users hoarded all the space?
Dell’s EXTPART. I will tell you that there is no guarantees with this and use at your risk. Since I’m a daring person , well honestly, just don’t want to go asking to shutdown the server, I’ve used this tool. I have used it quite often too. I’m still alive, the servers survived, and half the time they didn’t even know they were low on space because I proactively fixed the problem.
Now, this isn’t the magical tool that fixes everything because it does have some caveats. For instance, you can only expand system drives on while running if the VM was not P2V’d. If the VM’s were built from scratch or from a template this tool works great but if your VM was P2V’d you need to reboot into safe mode to expand the system drive. Expanding non system drives while running is perfectly fine on P2V’d VMs using EXTPART.
To use this EXTPART do the following:
- To use EXTPART to expand a drive you will first need to download the tool and save it to a location on the VM. The tool can be found here
- In vSphere, go to the settings of your VM and increase the Hard disk that you want to expand. If it’s the system drive then most likely you will want Hard disk1.
- Now go to your VM, open a Command Prompt and navigate to the directory where you saved the download.
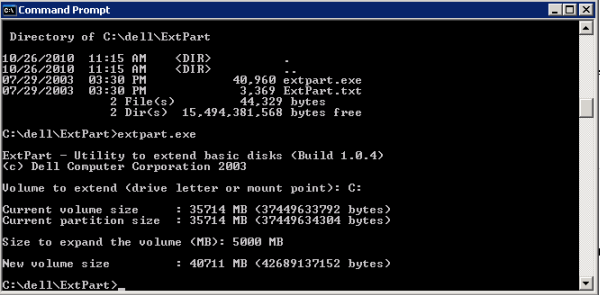
- Once you are in the file directory of EXTPART, run the extpart.exe file
- You will be prompted to type in the Volume or Drive that you want to expand, type in C:
- After putting the volume it will display the details of the drive, such as volume and partition size, and ask how much you want to expand the drive. At this point enter in the size (MB) that you want to expand the drive by. This is the amt you are increasing the drive with not the total size of the drive.
- Once complete press enter and the size of the increased volume will be displayed.
- If this fails with an error that “the disk is not accessible” then most likely the VM was P2V’d and you will need to reboot the VM into safe mode. Once booted into safe mode start at step 3 again.
So there you have it, an expanded drive on a running W2K3 VM. No time downtime and you look like a hero for expanding the drive. #WINWIN


I am getting the below error message:
Unable to connect to C: or it does not exist
Boot the system in safe mode and run the tool again.
Thanks for this. Helped me solve a long-standing problem on a client’s system. Why-oh-why does Dell ship servers with such a tiny microscopic C drive?
My issue is win2k3 server is reporting wrong space. In Disk Manager and explorer it shows disk capacity as 239.81gb(original system before conversion) but graphic shows correct space 1000GB. Any ideas? Expart shows same info 239 for volume, 1000gb for partition
Hello,
Thanks for your post
I want to know if it’s working with another material constructor like HP, or only Dell machine.
Thanks in advance
You should be able to use any device but don’t my word on it. It’s not guaranteed
Safe mode same problem: Unable to connect to C: or it does not exist
Do you have any open folders on that drive?
Saved the day! Works like a charm
How do you know if it was originally p2vd?